> ## Documentation Index
> Fetch the complete documentation index at: https://runpod-b18f5ded-promptless-websocket-streaming-tutorial.mintlify.site/llms.txt
> Use this file to discover all available pages before exploring further.
# Quickstart
> Write a handler function, build a worker image, create an endpoint, and send your first request.
For an even faster start, clone or download the [worker-basic](https://github.com/runpod-workers/worker-basic) repository for a pre-configured template for building and deploying Serverless workers. After cloning the repository, skip to [step 6 of this tutorial](#step-6%3A-build-and-push-your-docker-image) to deploy and test the endpoint.
## What you'll learn
In this tutorial you'll learn how to:
* Set up your development environment.
* Create a handler function.
* Test your handler locally.
* Create a Dockerfile to package your handler function.
* Build and push your worker image to Docker Hub.
* Deploy your worker to a Serverless endpoint using the Runpod console.
* Send a test request to your endpoint.
## Requirements
* You've [created a Runpod account](/get-started/manage-accounts).
* You've installed [Python 3.x](https://www.python.org/downloads/) and [Docker](https://docs.docker.com/get-started/get-docker/) on your local machine and configured them for your command line.
## Step 1: Create a Python virtual environment
First, set up a virtual environment to manage your project dependencies.
Run this command in your local terminal:
```sh theme={null}
# Create a Python virtual environment
python3 -m venv venv
```
```sh theme={null}
source venv/bin/activate
```
```sh theme={null}
venv\Scripts\activate
```
```sh theme={null}
pip install runpod
```
## Step 2: Create a handler function
Create a file named `handler.py` and add the following code:
```python handler.py theme={null}
import runpod
import time
def handler(event):
# This function processes incoming requests to your Serverless endpoint.
#
# Args:
# event (dict): Contains the input data and request metadata
#
# Returns:
# Any: The result to be returned to the client
# Extract input data
print(f"Worker Start")
input = event['input']
prompt = input.get('prompt')
seconds = input.get('seconds', 0)
print(f"Received prompt: {prompt}")
print(f"Sleeping for {seconds} seconds...")
# You can replace this sleep call with your own Python code
time.sleep(seconds)
return prompt
# Start the Serverless function when the script is run
if __name__ == '__main__':
runpod.serverless.start({'handler': handler })
```
This is a bare-bones handler that processes a JSON object and outputs a `prompt` string contained in the `input` object. You can replace the `time.sleep(seconds)` call with your own Python code for generating images, text, or running any machine learning workload.
## Step 3: Create a test input file
You'll need to create an input file to properly test your handler locally. Create a file named `test_input.json` and add the following code:
```json test_input.json theme={null}
{
"input": {
"prompt": "Hey there!"
}
}
```
## Step 4: Test your handler function locally
Run your handler function to verify that it works correctly:
```sh theme={null}
python handler.py
```
You should see output similar to this:
```text theme={null}
--- Starting Serverless Worker | Version 1.7.9 ---
INFO | Using test_input.json as job input.
DEBUG | Retrieved local job: {'input': {'prompt': 'Hey there!'}, 'id': 'local_test'}
INFO | local_test | Started.
Worker Start
Received prompt: Hey there!
Sleeping for 0 seconds...
DEBUG | local_test | Handler output: Hey there!
DEBUG | local_test | run_job return: {'output': 'Hey there!'}
INFO | Job local_test completed successfully.
INFO | Job result: {'output': 'Hey there!'}
INFO | Local testing complete, exiting.
```
## Step 5: Create a Dockerfile
Create a file named `Dockerfile` with the following content:
```dockerfile Dockerfile theme={null}
FROM python:3.10-slim
WORKDIR /
# Install dependencies
RUN pip install --no-cache-dir runpod
# Copy your handler file
COPY handler.py /
# Start the container
CMD ["python3", "-u", "handler.py"]
```
## Step 6: Build and push your worker image
Instead of building and pushing your image via Docker Hub, you can also [deploy your worker from a GitHub repository](/serverless/workers/github-integration).
Before you can deploy your worker on Runpod Serverless, you need to push it to Docker Hub:
Build your Docker image, specifying the platform for Runpod deployment, replacing `[YOUR_USERNAME]` with your Docker username:
```sh theme={null}
docker build --platform linux/amd64 --tag [YOUR_USERNAME]/serverless-test .
```
```sh theme={null}
docker push [YOUR_USERNAME]/serverless-test:latest
```
## Step 7: Deploy your worker using the Runpod console
To deploy your worker to a Serverless endpoint:
1. Go to the [Serverless section](https://www.console.runpod.io/serverless) of the Runpod console.
2. Click **New Endpoint**.
3. Click **Import from Docker Registry**
4. In the **Container Image** field, enter your Docker image URL: `docker.io/yourusername/serverless-test:latest`.
5. Click **Next** to proceed to endpoint configuration.
6. Configure your endpoint settings:
* (Optional) Enter a custom name for your endpoint, or use the randomly generated name.
* Make sure the **Endpoint Type** is set to **Queue**.
* Under **GPU Configuration**, check the box for **16 GB** GPUs.
* Leave the rest of the settings at their defaults.
7. Click **Deploy Endpoint**.
The system will redirect you to a dedicated detail page for your new endpoint.
## Step 8: Test your endpoint
To test your endpoint, click the **Requests** tab in the endpoint detail page:
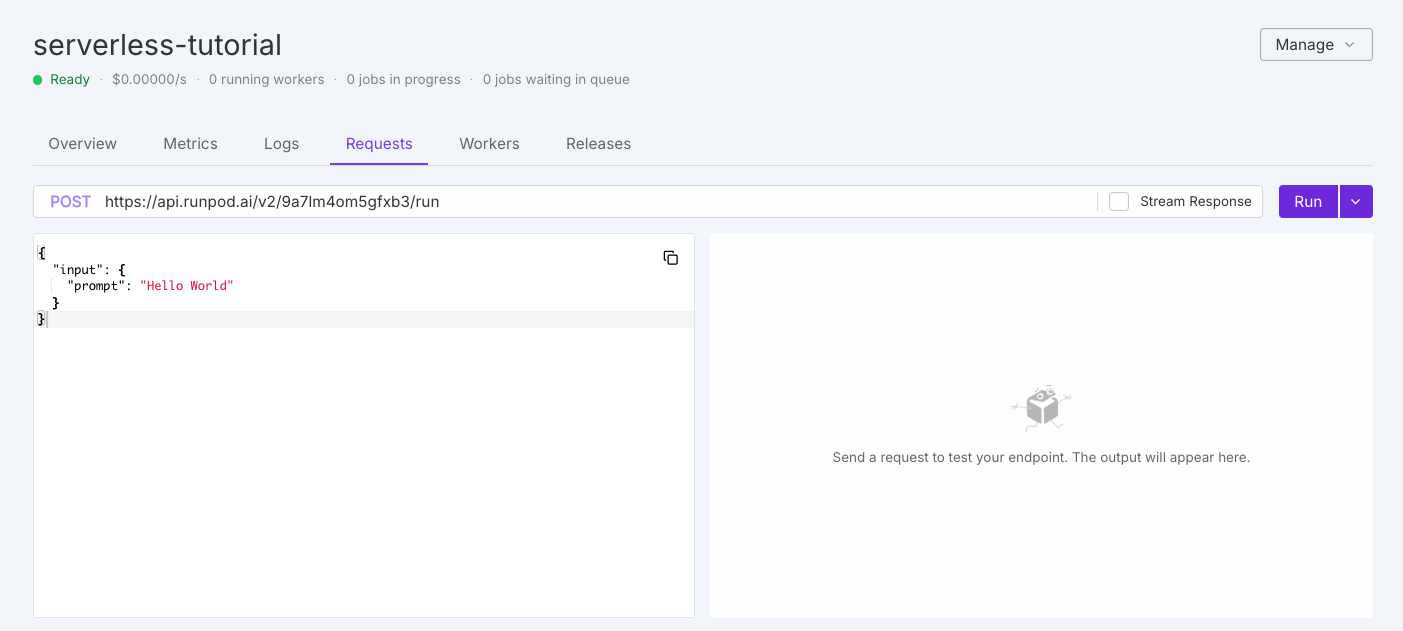 On the left you should see the default test request:
```json theme={null}
{
"input": {
"prompt": "Hello World"
}
}
```
Leave the default input as is and click **Run**. The system will take a few minutes to initialize your workers.
When the workers finish processing your request, you should see output on the right side of the page similar to this:
```json theme={null}
{
"delayTime": 15088,
"executionTime": 60,
"id": "04f01223-4aa2-40df-bdab-37e5caa43cbe-u1",
"output": "Hello World",
"status": "COMPLETED",
"workerId": "uhbbfre73gqjwh"
}
```
Congratulations! You've successfully deployed and tested your first Serverless endpoint.
## Next steps
Now that you've learned the basics, you're ready to:
* [Create more advanced handler functions.](/serverless/workers/handler-functions)
* [Update your Dockerfile with AI/ML models and other dependencies.](/serverless/workers/create-dockerfile)
* [Learn how to structure and send requests to your endpoint.](/serverless/endpoints/send-requests)
* [Manage your Serverless endpoints in the Runpod console.](/serverless/endpoints/overview)
On the left you should see the default test request:
```json theme={null}
{
"input": {
"prompt": "Hello World"
}
}
```
Leave the default input as is and click **Run**. The system will take a few minutes to initialize your workers.
When the workers finish processing your request, you should see output on the right side of the page similar to this:
```json theme={null}
{
"delayTime": 15088,
"executionTime": 60,
"id": "04f01223-4aa2-40df-bdab-37e5caa43cbe-u1",
"output": "Hello World",
"status": "COMPLETED",
"workerId": "uhbbfre73gqjwh"
}
```
Congratulations! You've successfully deployed and tested your first Serverless endpoint.
## Next steps
Now that you've learned the basics, you're ready to:
* [Create more advanced handler functions.](/serverless/workers/handler-functions)
* [Update your Dockerfile with AI/ML models and other dependencies.](/serverless/workers/create-dockerfile)
* [Learn how to structure and send requests to your endpoint.](/serverless/endpoints/send-requests)
* [Manage your Serverless endpoints in the Runpod console.](/serverless/endpoints/overview)