In this tutorial, you’ll build a Serverless endpoint that streams data back to your client using WebSocket-style streaming. This approach works well for workloads that process data incrementally—like image processing or text generation—where you want to return partial results as they become available.
You’ll create a handler that simulates chunked image processing, deploy it to Runpod Serverless, and build a Python client that receives streamed responses in real time.
What you’ll learn
- Create a streaming handler function that yields incremental results.
- Deploy a custom worker with streaming enabled.
- Send requests to your endpoint and receive streamed responses.
- Process and display streaming output in a Python client.
Requirements
Before starting, you’ll need:
- A Runpod account with credits.
- A Runpod API key.
- Python 3.9+ installed locally.
- Docker installed and configured.
- A Docker Hub account for pushing your worker image.
Step 1: Set up your development environment
Create a project directory and set up a Python virtual environment:
mkdir runpod-base64-stream
cd runpod-base64-stream
python -m venv venv
source venv/bin/activate
pip install runpod Pillow
Step 2: Create a streaming handler function
Create a file named handler.py with the following code:
import runpod
import base64
import io
from PIL import Image
import time

def process_image_chunk(chunk_data, chunk_number, total_chunks):
    """
    Simulate processing a chunk of image data.
    In a real application, you might do actual image processing here.
    """
    return {
        "chunk_number": chunk_number,
        "chunk_size": len(chunk_data),
        "processed_at": time.strftime("%H:%M:%S")
    }

def generator_handler(job):
    """
    Handler that processes a base64 encoded image in chunks and streams results.
    """
    job_input = job["input"]

    # Get the base64 string from input
    base64_string = job_input.get("base64_image")
    if not base64_string:
        yield {"error": "No base64_image provided in input"}
        return

    try:
        # Decode base64 string
        image_data = base64.b64decode(base64_string)

        # Open image to validate and get info
        image = Image.open(io.BytesIO(image_data))

        # Get image info for initial metadata
        yield {
            "status": "started",
            "image_info": {
                "format": image.format,
                "size": image.size,
                "mode": image.mode
            }
        }

        # Simulate processing image in chunks
        # In a real application, you might process different parts of the image
        chunk_size = len(image_data) // 4  # Process in 4 chunks
        total_chunks = (len(image_data) + chunk_size - 1) // chunk_size

        for i in range(total_chunks):
            start_idx = i * chunk_size
            end_idx = min(start_idx + chunk_size, len(image_data))
            chunk = image_data[start_idx:end_idx]

            # Process this chunk
            result = process_image_chunk(chunk, i + 1, total_chunks)

            # Add progress information
            result["progress"] = f"{i + 1}/{total_chunks}"
            result["percent_complete"] = ((i + 1) / total_chunks) * 100

            # Stream the result for this chunk
            yield result

            # Simulate processing time
            time.sleep(1)

        # Send final completion message
        yield {
            "status": "completed",
            "total_chunks_processed": total_chunks,
            "final_timestamp": time.strftime("%H:%M:%S")
        }

    except Exception as e:
        yield {"error": str(e)}

# Start the serverless function with streaming enabled
runpod.serverless.start({
    "handler": generator_handler,
    "return_aggregate_stream": True
})
- Accepts a base64-encoded image in the request input.
- Yields an initial status message with image metadata.
- Processes the image in chunks, yielding progress updates for each chunk.
- Sends a final completion message when done.
The key to streaming is using yield instead of return, and setting return_aggregate_stream to True when starting the serverless function. This makes the streamed results available via the /stream endpoint.
Step 3: Create a Dockerfile
Create a Dockerfile to package your handler:
FROM python:3.9-slim

WORKDIR /app

# Install system dependencies for Pillow
RUN apt-get update && apt-get install -y \
    libjpeg-dev \
    zlib1g-dev \
    && rm -rf /var/lib/apt/lists/*

COPY requirements.txt .
RUN pip install --no-cache-dir -r requirements.txt

COPY handler.py .

CMD [ "python", "-u", "handler.py" ]
requirements.txt file:
runpod==1.3.0
Pillow==9.5.0
Step 4: Build and push your Docker image
Build and push your image to Docker Hub:
docker build --platform linux/amd64 -t YOUR_DOCKERHUB_USERNAME/runpod-base64-stream:latest .
docker push YOUR_DOCKERHUB_USERNAME/runpod-base64-stream:latest
YOUR_DOCKERHUB_USERNAME with your actual Docker Hub username.
Step 5: Create a Serverless endpoint
Deploy your worker to a Serverless endpoint using the Runpod console:
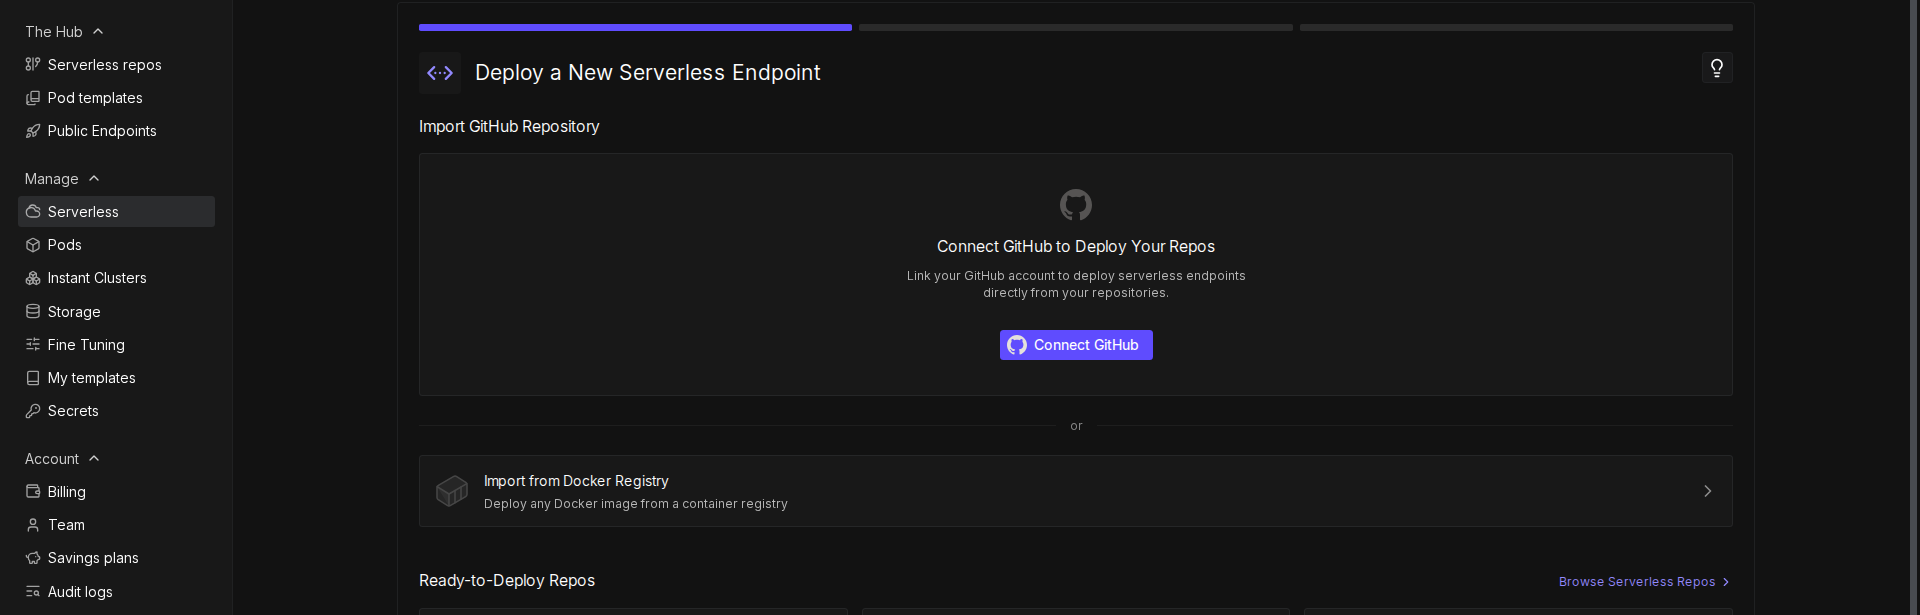
- Go to the Serverless section of the Runpod console.
- Click New Endpoint.
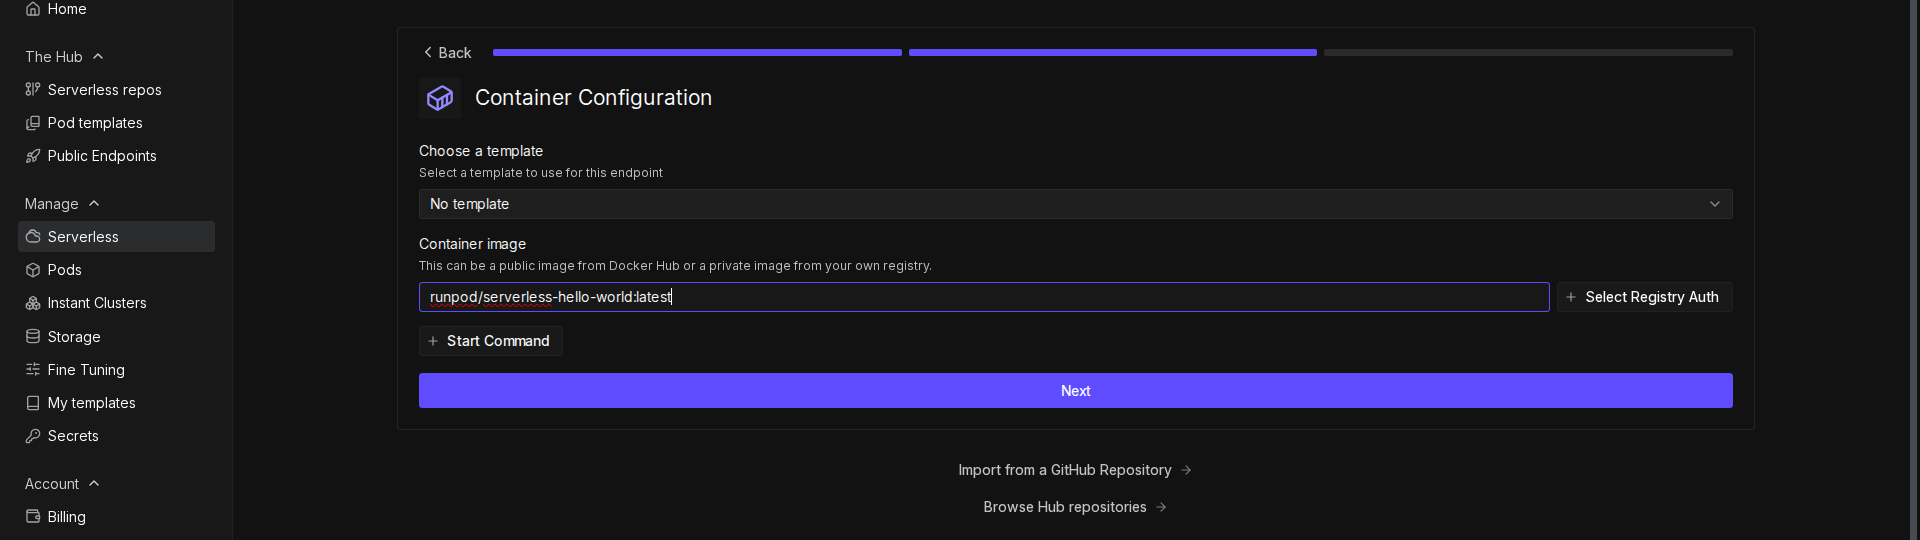
- Click Import from Docker Registry.
- In the Container Image field, enter your Docker image URL (e.g.,
docker.io/YOUR_DOCKERHUB_USERNAME/runpod-base64-stream:latest).
- Click Next.
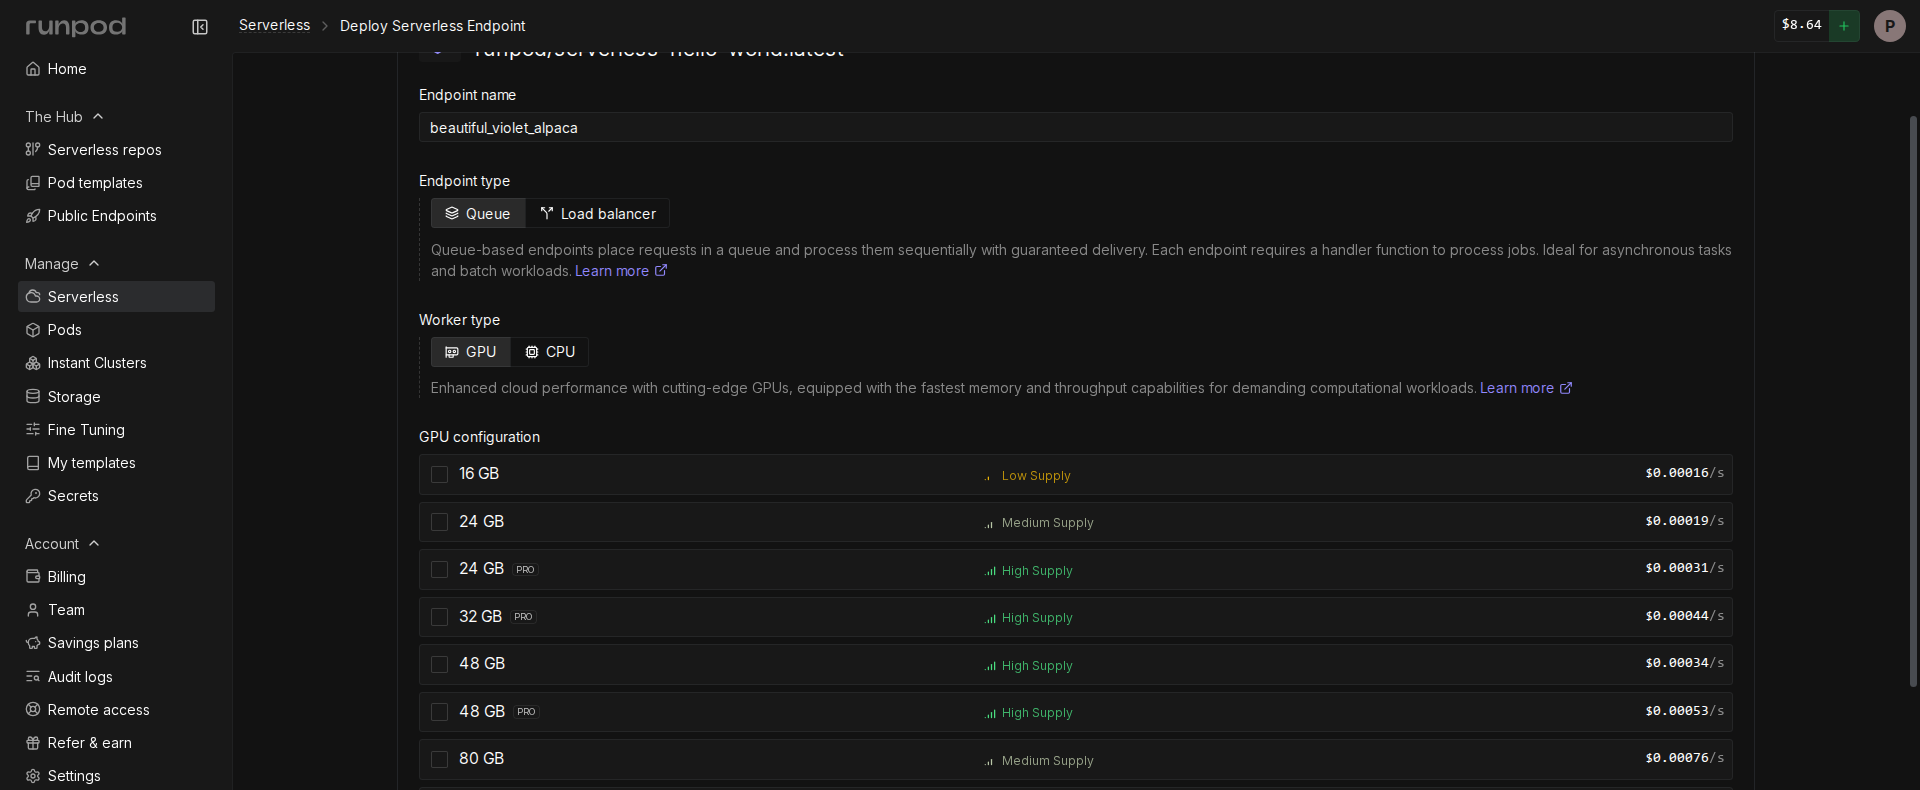
- Configure your endpoint:
- Enter a name for your endpoint, or use the randomly generated name.
- Make sure Endpoint Type is set to Queue.
- Under GPU Configuration, select 16 GB GPUs.
- Leave the rest of the settings at their defaults.
- Click Deploy Endpoint.
Once deployed, note the Endpoint ID from the endpoint details page—you’ll need it in the next step.
Step 6: Test the endpoint
Create a file named test_endpoint.py to test your streaming endpoint:
import requests
import json
import time
import base64
from PIL import Image
import io
import os

API_KEY = "YOUR_RUNPOD_API_KEY"
ENDPOINT_ID = "YOUR_ENDPOINT_ID"

# Set up the output directory for saving images
OUTPUT_DIR = os.path.join(os.getcwd(), "output_images")

# Create the output directory if it doesn't exist
if not os.path.exists(OUTPUT_DIR):
    os.makedirs(OUTPUT_DIR)
    print(f"Created output directory: {OUTPUT_DIR}")

def create_test_image():
    """
    Creates a test image and converts it to base64 format.

    Returns:
        str: The image encoded as a base64 string
    """
    # Create a new 100x100 pixel image with a red background
    img = Image.new('RGB', (100, 100), color='red')

    # Create a bytes buffer to hold the image data
    img_byte_arr = io.BytesIO()

    # Save the image to the buffer in PNG format
    img.save(img_byte_arr, format='PNG')

    # Get the byte data from the buffer
    img_byte_arr = img_byte_arr.getvalue()

    # Save a copy of the input image to disk
    input_path = os.path.join(OUTPUT_DIR, 'test_image_input.png')
    img.save(input_path)
    print(f"Saved input test image as: {input_path}")

    # Convert the image bytes to base64 string and return it
    return base64.b64encode(img_byte_arr).decode('utf-8')

def save_base64_image(base64_string, filename):
    """
    Converts a base64 string back to an image and saves it to disk.

    Args:
        base64_string (str): The image data as a base64 string
        filename (str): The name to give the saved file
    """
    try:
        # Create the full path where the file will be saved
        output_path = os.path.join(OUTPUT_DIR, filename)

        # Convert the base64 string back to bytes
        image_data = base64.b64decode(base64_string)

        # Create an image from the bytes
        image = Image.open(io.BytesIO(image_data))

        # Save the image as a PNG file
        image.save(output_path, 'PNG')
        print(f"Saved processed image as: {output_path}")

        return True
    except Exception as e:
        print(f"Error saving image: {str(e)}")
        return False

# Set up the API endpoint URLs
run_url = f"https://api.runpod.ai/v2/{ENDPOINT_ID}/run"

# Set up the headers for the API request
headers = {
    "Authorization": f"Bearer {API_KEY}",
    "Content-Type": "application/json"
}

# Print a redacted version of the authorization header for debugging
print("Using Authorization header:", headers["Authorization"][:10] + "...")

# Create the test image and get its base64 representation
base64_image = create_test_image()

# Create the payload for our API request
payload = {
    "input": {
        "base64_image": base64_image
    }
}

# Send the initial request to start the job
print("\nSending request to:", run_url)
response = requests.post(run_url, headers=headers, json=payload)

# Print debug information about the response
print("Status Code:", response.status_code)

# Check for authentication errors
if response.status_code == 401:
    print("\nAuthentication Error: Please check your API key")
    exit()

try:
    # Parse the JSON response
    job_status = response.json()
    job_id = job_status["id"]
    print(f"\nStarted job: {job_id}")

    # Set up the streaming URL for getting results
    stream_url = f"https://api.runpod.ai/v2/{ENDPOINT_ID}/stream/{job_id}"

    # Keep checking for results until the job is done
    while True:
        # Get the current status of the job
        stream_response = requests.get(stream_url, headers=headers)
        stream_data = stream_response.json()

        # Check if the job is completed
        if stream_data["status"] == "COMPLETED":
            print("\nJob completed!")
            break

        # Check if the job is still running and has new data
        elif stream_data["status"] == "IN_PROGRESS" and stream_data.get("stream"):
            # Process each piece of output data
            for output in stream_data["stream"]:
                print(f"Received: {json.dumps(output, indent=2)}")

                # If we received a processed image, save it
                if "processed_image" in output:
                    filename = f"output_image_{output.get('chunk_number', 'final')}.png"
                    save_base64_image(output["processed_image"], filename)

        # Check if the job failed
        elif stream_data["status"] == "FAILED":
            print("\nJob failed!")
            print(stream_data.get("error", "No error message provided"))
            break

        # Wait a bit before checking again
        time.sleep(0.5)

except json.JSONDecodeError as e:
    print("\nError decoding JSON response:", str(e))
except KeyError as e:
    print("\nError accessing response data:", str(e))
    print("Full response:", job_status)
except Exception as e:
    print("\nUnexpected error:", str(e))
Replace YOUR_RUNPOD_API_KEY and YOUR_ENDPOINT_ID with your actual API key and endpoint ID before running the script.
Started job: 123e4567-e89b-12d3-a456-426614174000
Received: {
  "status": "started",
  "image_info": {
    "format": "PNG",
    "size": [100, 100],
    "mode": "RGB"
  }
}
Received: {
  "chunk_number": 1,
  "chunk_size": 2500,
  "processed_at": "14:30:45",
  "progress": "1/4",
  "percent_complete": 25.0
}
...
Received: {
  "status": "completed",
  "total_chunks_processed": 4,
  "final_timestamp": "14:30:48"
}
Job completed!
/stream endpoint to receive incremental results as they become available.
Next steps
Now that you’ve built a streaming endpoint, explore these related topics: